When connecting to the UALR-WiFi network, you may see several other networks including UALR-IoT. We own both of these networks but sometimes users may connect to the other networks accidentally, or change their NetID password. On many devices, once you connect to a network one time, the system will continue to try to connect to that network as a default. In the event you change your NetID password, connecting to either of the UALR networks will fail. If you are having one of these issues, follow the directions below to remove connections to the network for your particular device.
Step-by-step guide
Windows 7 and earlier
- Open the Control Panel
- Open the Network and Sharing Center
- Select Manage wireless networks
- Select the desired network
- Click Remove
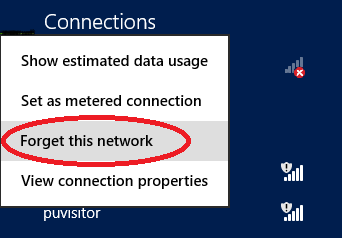
Windows 8
- Select the wireless icon in the bottom right corner
- Right click on the network name (for tablets, you may need to tap and hold on the network name)
- Select Forget this network
Windows 10
To forget a wireless network in Windows 10, you can use the Settings app. Launch the Settings app by opening your Start menu and clicking “Settings.”
- Launch the Settings app by opening your Start Menu and clicking "Settings."

- Inside the Settings app, select Network & Internet.

- Select Wi-Fi in the Network & Internet list.

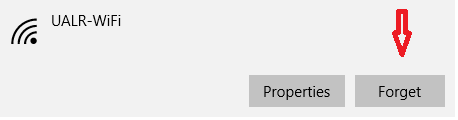
- Select Manage known networks in the Wi-Fi settings section to view the complete list of all the Wi-Fi networks your Windows 10 PC or device currently knows.

- Select the wireless network that you want to remove from your Windows 10 PC or device.

6. Then select Forget to immediately remove the wireless network from the list of known networks.
If there are other networks you want your Windows 10 device to forget, repeat this procedure.
Source: Digital Citizen, modified from original / CC BY-NC-SA 4.0
Mac OS
- Click the wireless icon in the upper right corner
- Select Open Network Preferences
- Make sure Wi-Fi is selected on the left and select Advanced (On older versions of Mac OS, Wi-Fi may be listed as Airport instead).
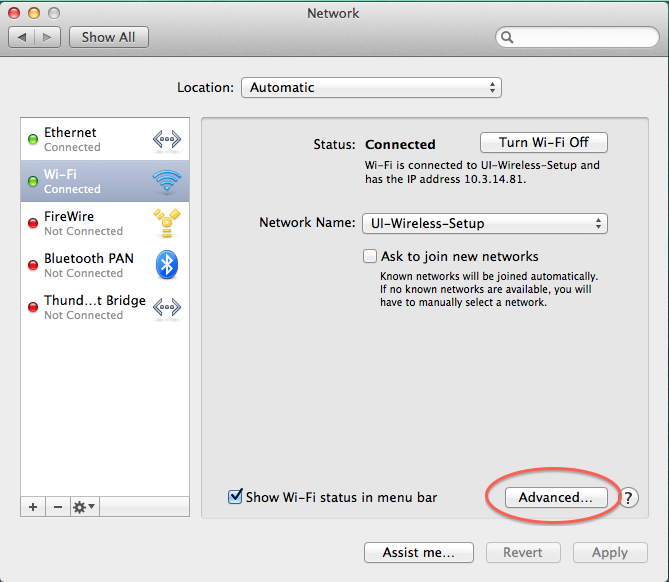
4. Under Preferred Networks, select the network you would like to remove.
5. Select the minus button below the box to remove the network
6. Click Okay and Apply to save the changes (Note: You may also need to turn the Wi-Fi off and back on again to see the change).
iOS (iPhone, iPad)
- Go to Settings
- Select Wi-Fi
- Select the blue i to the right of the network name (in older versions of iOS, this may show as a blue arrow)
- Select Forget this Network
- Confirm that you want to Forget the Wi-Fi network
Android
- Navigate to your wireless networks. (Note: The steps to do this may vary depending on your device)
- Tap and hold on the desired network.
- Select Forget this Network or Remove this Network (this may vary depending on your device)
Related articles