Downgrade Java to a previous version
These instructions are primarily for Banner users who need to downgrade their currently-installed Java to a previous version for compatibility with the Banner application. If you do not use Banner on your computer, please always use the latest version of Java.
IT Services provides access to previous versions of Java at a network share location only accessible from the campus network.
Step-by-step: Microsoft Windows
\\shares.ualr.edu\public\Java older versions\
Follow these steps to downgrade your Java installation to a previous version on Microsoft Windows.
Uninstall Java
- Open a Windows Explorer window and navigate to the campus network share (Windows) path.
- Copy the file JavaUninstallTool.exe to your computer.
- Run the uninstall program. If prompted, run it as Administrator.
- Follow the Java Uninstall Tool prompts until the uninstall has completed successfully.
Install an older version of Java
From the same campus network share, copy the appropriate Java install file to your computer. For example, the 64-bit Windows install file for Java version 8 update 121 is named jre-8u121-windows-x64.exe.
If you do not know which installer version (32-bit or 64-bit) to run, try 64-bit. Only install the 32-bit version if your computer requires that to run Banner.
- Run the install program. If prompted, run it as Administrator.
- Follow the Java Install prompts until the installation has completed successfully.
Step-by-step: Apple macOS
smb://shares.ualr.edu/public/Java older versions/
Follow these steps to downgrade your Java installation to a previous version on Apple macOS.
Uninstall Java
- Open Finder.
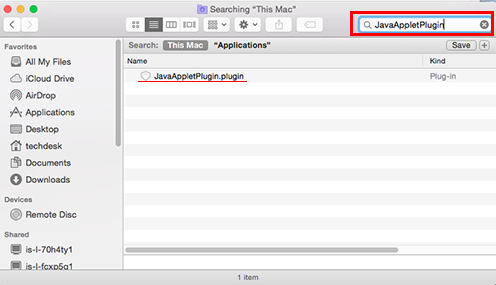
- In the Search bar, enter "JavaAppletPlugin" and then select the "This Mac" button to search for the Java program file named JavaAppletPlugin.plugin (see figure 1).
- Drag the file JavaAppletPlugin.plugin to the Trash (or right-click the file, and select Move to Trash from the drop-down menu).
Install an older version of Java
- Still in Finder, connect to the campus network share by selecting the Go menu and then selecting Connect to Server.
- Enter the campus network share (macOS) path and select Connect. If prompted, enter your FACSTAFF credentials (e.g., facstaff\username) to log in.
- Copy the appropriate Java install file to your computer. For example, the 64-bit macOS install file for Java version 8 update 121 is named jre-8u121-macosx-x64.dmg.
- Open the .dmg file and run the Java application installer. Follow the Java install prompts until the installation has completed successfully.
Related articles
